
Information about Installing Oracle 10gR2 CRS for RAC
This document will describe step by step how to install CRS for Oracle RAC. Please read the Prerequisite Information before beginning and make sure those requirements are met.
This is the first Part in Oracle Software Install Guide.
Document Creator Todd Walters
Requirements
- All these Sections must be complete before Installing CRS on RAC Servers:
Pre Installation Guide
- How to Install Linux Oracle RAC Virtual Server
- Prepare Linux Virtual Servers for Oracle RAC
- Prepare Linux Physical Servers for Oracle RAC
- How To Configure Oracle RAC OCR and Voting Disks
Oracle Software Installation Guide
- Prepare Linux Environment for GUI Access for Oracle Installation
- How to Perform Pre-Installation Tasks for Oracle RAC Virtual Servers
- How to Install Oracle 10gR2 CRS
- How to Install Oracle 10gR2 ASM
- How to Install Oracle 10gR2 DB Home
- How to Install Oracle 10gR4 CRS Patch
- How to Install Oracle 10gR4 ASM Patch
- How to Install Oracle 10gR4 DB Home Patch
- How to Configure Oracle ASM Disks for RAC Virtual Servers
- For Physical see How to Configure ASM Disks for Physical Servers guide.
- How to Install Oracle 10gR4 ASM Instance
- How to Install Oracle 10gR4 Database Instance
How to Install Oracle 10gR2 CRS Software
- Login with VNC Viewer to Node 1 as Oracle User
- CRS Software Location: /home/source/Oracle/software/crs/base/10.2.0/linux_64bit/clusterware
- > cd /home/source/Oracle/software/crs/base/10.2.0/linux_64bit/clusterware
- Start OUI Installer
- csrv0dbxd11 | ORA1020 | /home/source/Oracle/software/crs/base/10.2.0.1/linux_64bit/clusterware
> ./runInstaller - Choose Y when prompted if rootpre.sh has been run
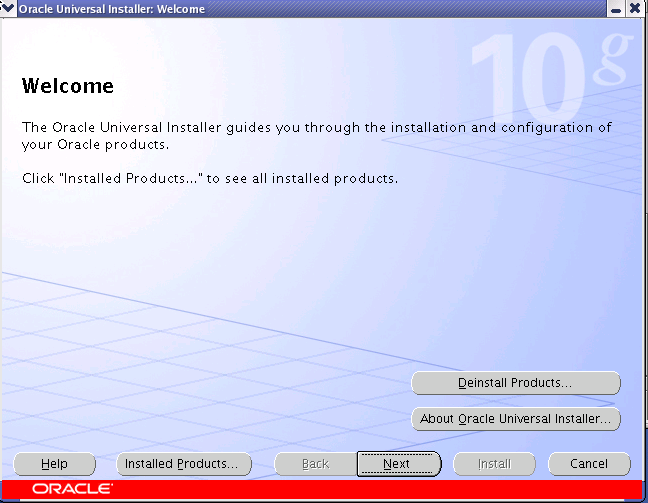
- At CRS Install Welcome Screen Click Next
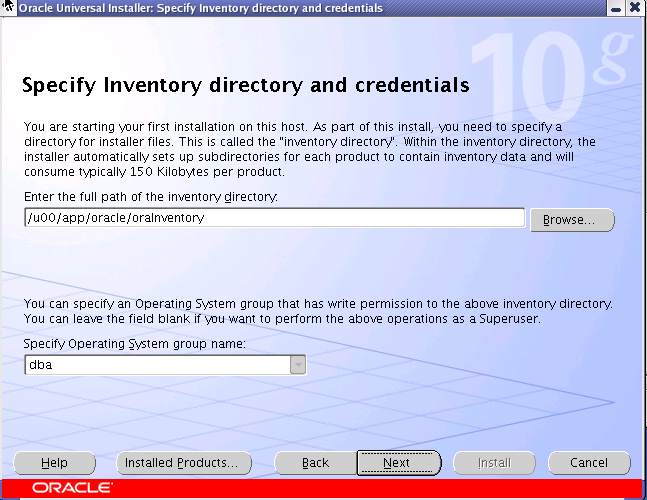
- At Specify Inventory directory and credentials screen verify location then click Next
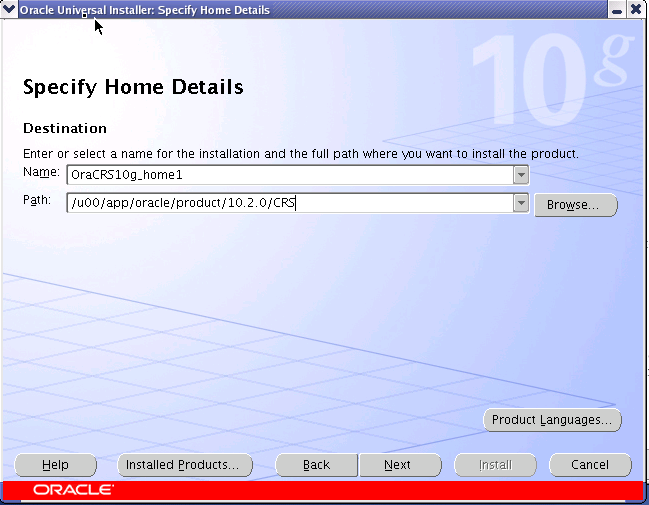
- On the Specify Home Details page, remove the 2nd oracle in the path and make CRS all caps and click Next.
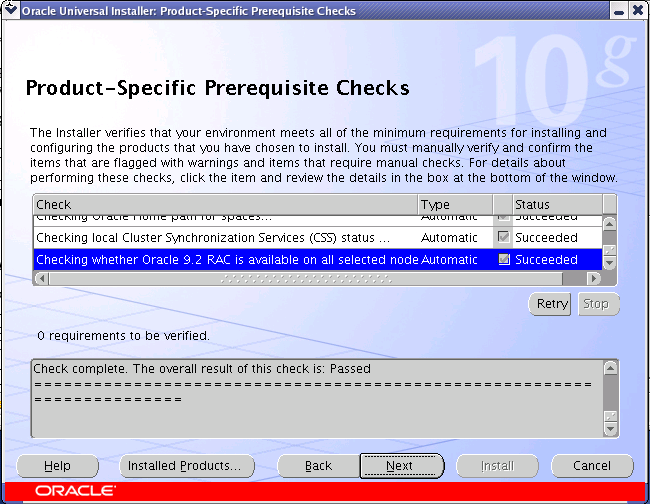
- On the CRS : Product-Specific Prerequisite Checks page do the following:
- Verify there were no errors during validation.
- Correct any errors or checks that fail.
- The overall result of this check should say Passed, if so, click Next
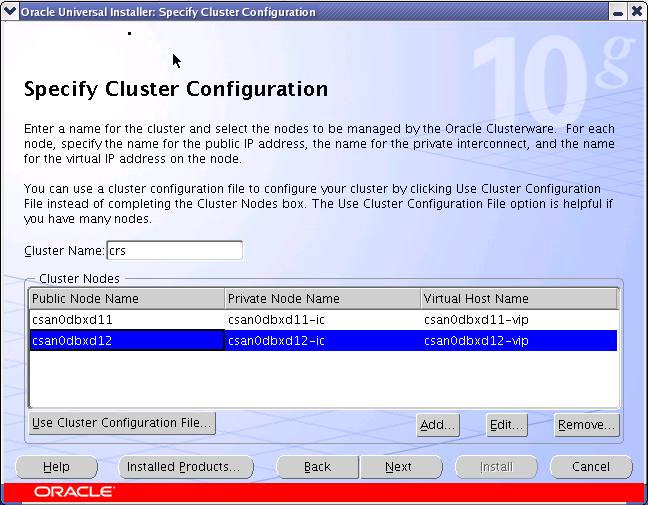
- On the Specify Cluster Configration screen, edit the Private node name for for node 1. Then Add Node 2. Change the Cluster Name to dsan_dev and click Next.
- The Entries above come from the /etc/hosts file
- Notice the naming convention used:
- -ic = Interconnect or Private Network
- -vip = Virtual IP
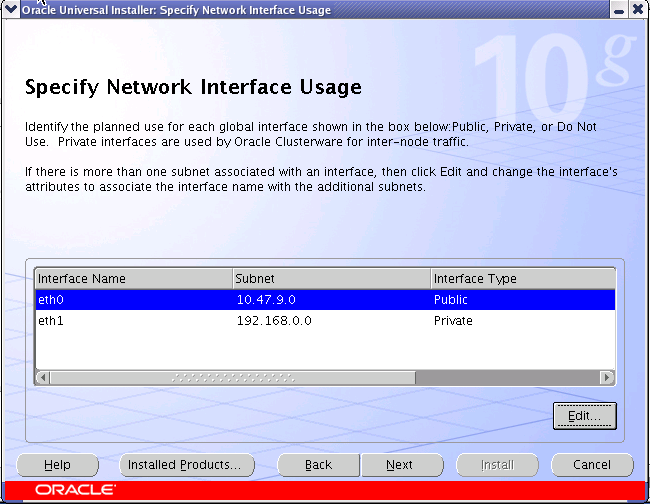
- On the Specify Network Interface Usage screen, change eth0 to Public
- On the Specify Oracle Cluster Registry Location screen, Choose Normal Redundancy and enter the location to the OCR Disks. You can run cat /etc/sysconfig/rawdevices to view what rawdevices are configured.
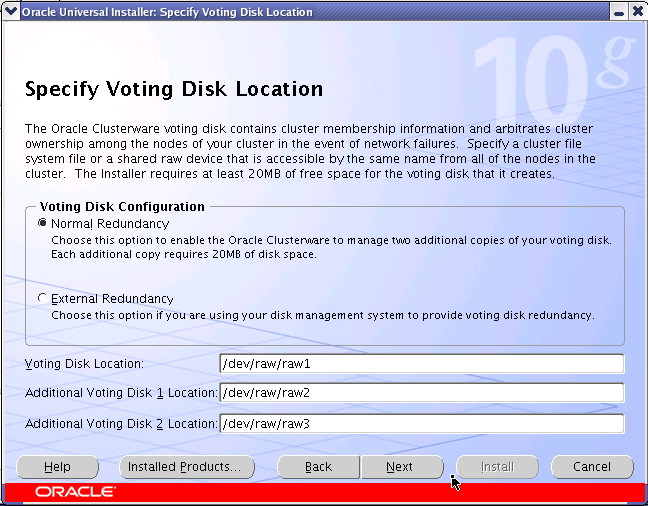
- On the Specify Voting Disk Location screen, Make sure Normal Redundancy is checked and then enter the paths to the Voting Disks.
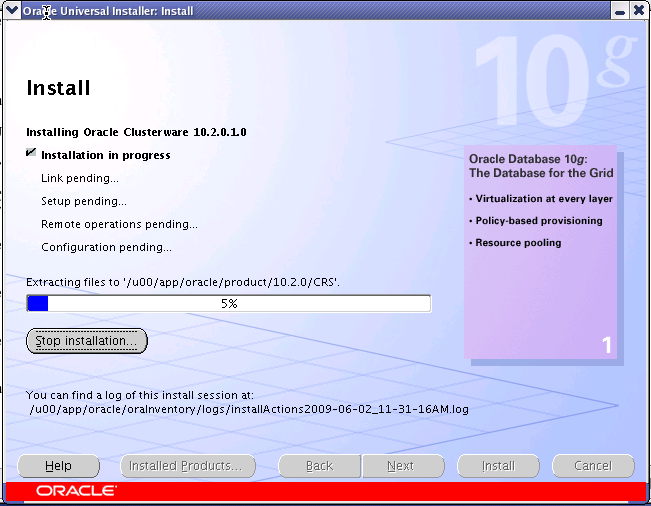
- On the Summary Oracle Clusterware screen, review settings and then click Install.
- CRS Install Progress
- On the CRS Execute Configuration Scripts screen
- You must run this patch before running the root scripts on all nodes.
- To run Patch 4679769 which has been scripted in /export/home/oracle/ln.sh and run as root.
- See section 4.2.1.1 of Atlanta's Oracle Install Guide by Eddie Ambler
- [root@csrv0dbxd11 ~]# /export/home/oracle/ln.sh
- To run script as root use sudo. Note, must run on both nodes.
- $ sudo /u00/app/oracle/oraInventory/orainstRoot.sh
Changing permissions of /u00/app/oracle/oraInventory to 770.
Changing groupname of /u00/app/oracle/oraInventory to dba.
The execution of the script is complete
csrv0dbxd11 | ORA1020 | /export/home/oracle
> sudo /u00/app/oracle/product/10.2.0/CRS/root.sh
WARNING: directory '/u00/app/oracle/product/10.2.0' is not owned by root
WARNING: directory '/u00/app/oracle/product' is not owned by root
WARNING: directory '/u00/app/oracle' is not owned by root
WARNING: directory '/u00/app' is not owned by root
WARNING: directory '/u00' is not owned by root
Checking to see if Oracle CRS stack is already configured
/etc/oracle does not exist. Creating it now.
Setting the permissions on OCR backup directory
Setting up NS directories
Oracle Cluster Registry configuration upgraded successfully
WARNING: directory '/u00/app/oracle/product/10.2.0' is not owned by root
WARNING: directory '/u00/app/oracle/product' is not owned by root
WARNING: directory '/u00/app/oracle' is not owned by root
WARNING: directory '/u00/app' is not owned by root
WARNING: directory '/u00' is not owned by root
Successfully accumulated necessary OCR keys.
Using ports: CSS=49895 CRS=49896 EVMC=49898 and EVMR=49897.
node <nodenumber>: <nodename> <private interconnect name> <hostname>
node 1: csrv0dbxd11 csrv0dbxd11-ic csrv0dbxd11
node 2: csrv0dbxd12 csrv0dbxd12-ic csrv0dbxd12
Creating OCR keys for user 'root', privgrp 'root'..
Operation successful.
Now formatting voting device: /dev/raw/raw1
Now formatting voting device: /dev/raw/raw2
Now formatting voting device: /dev/raw/raw3
Format of 3 voting devices complete.
Startup will be queued to init within 90 seconds.
setting setdirinfo
setting setaliasinfo
Adding daemons to inittab
Expecting the CRS daemons to be up within 600 seconds.
CSS is active on these nodes.
csrv0dbxd11
CSS is inactive on these nodes.
csrv0dbxd12
Local node checking complete.
Run root.sh on remaining nodes to start CRS daemons.Note you should see that CRS/CSS is up on all nodes;CSS is active on these nodes.
csrv0dbxd11
csrv0dbxd12
CSS is active on all nodes.
Waiting for the Oracle CRSD and EVMD to start
Oracle CRS stack installed and running under init(1M)
Running vipca(silent) for configuring nodeapps
The given interface(s), "eth0" is not public. Public interfaces should be used to configure virtual IPs. - After running the patch click next and you will see the following error: This is an expected error.
- Click OK and then run VIPCA manually as root as follows:
- > /u00/app/oracle/product/10.2.0/CRS/bin/vipca
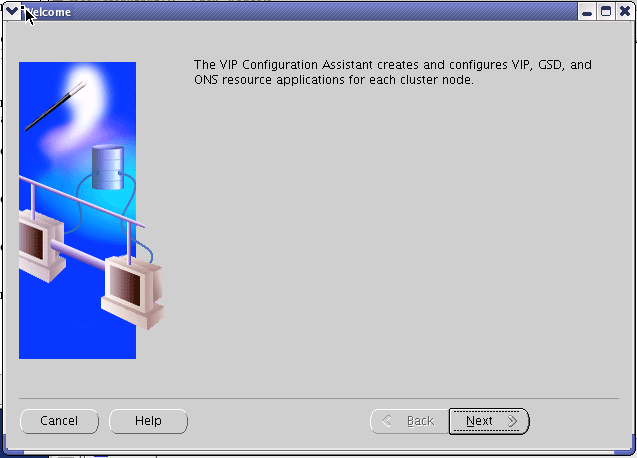
- Run VIPCA Client manually and click Next on Welcome screen.
- On Network Configuration1 of 2 screen select eth0 then click Next;
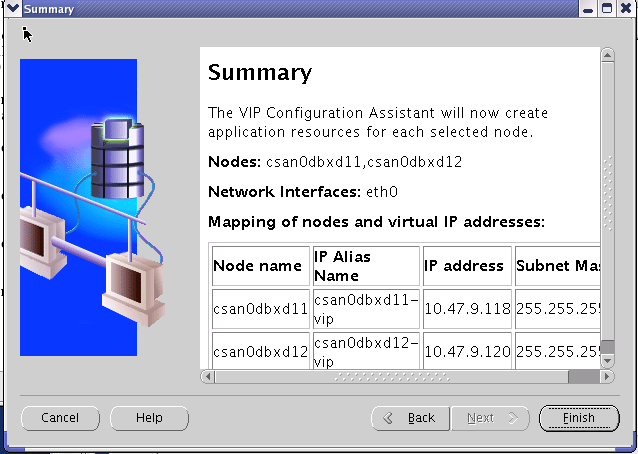
- On VIPCA Network Configuration 2 of 2 click in IP address field and enter VIP address. This should cause the other fields to be populated. Then edit for each additional node.
- On the VIPCA Summary screen click Finish
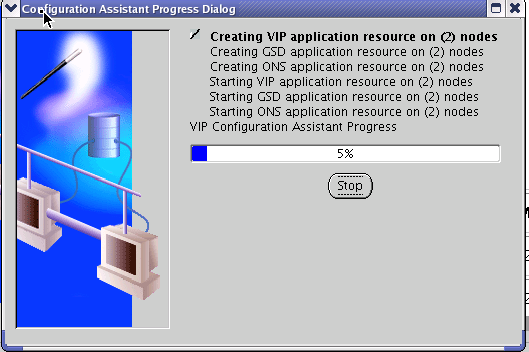
- Next you should see a Progress screen.
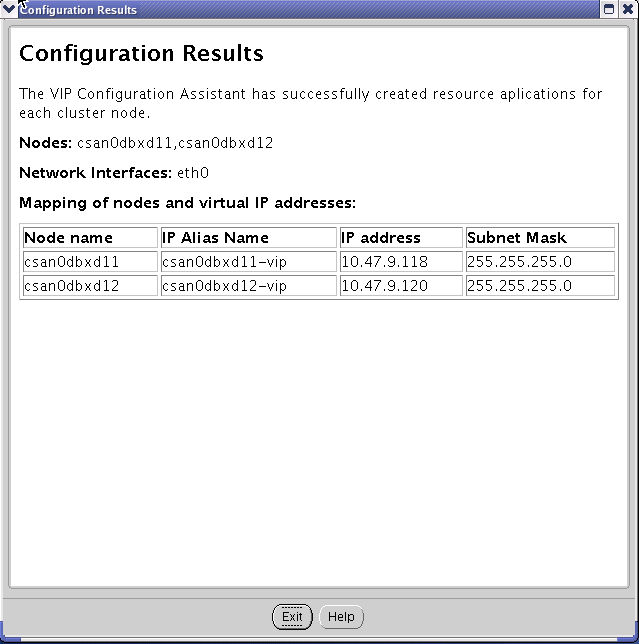
- On the VIPCA Configuration Results screen click Exit
- On the CRS - Configuration Assistants screen, click Retry
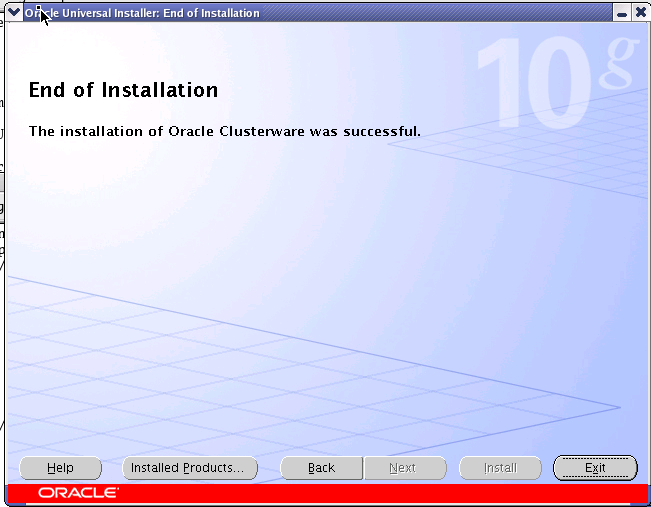
- Next the CRS Install should be Successful
- To verify CRS is up, run showcrs as oracle from terminal.
- csrv0dbxd11 | ORA1020 | /export/home/oracle
> showcrsHA Resource Target State
----------- ------ -----
ora.csrv0dbxd11.gsd ONLINE ONLINE on csrv0dbxd11
ora.csrv0dbxd11.ons ONLINE ONLINE on csrv0dbxd11
ora.csrv0dbxd11.vip ONLINE ONLINE on csrv0dbxd11
ora.csrv0dbxd12.gsd ONLINE ONLINE on csrv0dbxd12
ora.csrv0dbxd12.ons ONLINE ONLINE on csrv0dbxd12
ora.csrv0dbxd12.vip ONLINE ONLINE on csrv0dbxd12 - Continue on to the ASM Section 4 in the Linux Oracle RAC Installation Guide or go to the How to Install Oracle 10gR2 ASM guide from here.


No comments:
Post a Comment