
Information about How to Install Oracle 10gR4 ASM Instance
This document will explain how to install ASM Instance on Node 1 of Oracle RAC Cluster.
Document Creator Modified
Todd Walters 06/03/2009 01/11/2010
Requirements
All these Sections must be complete before Install ASM Instance on RAC Servers:
Pre Installation Guide
1. How to Install Linux Oracle RAC Virtual Server
2. Prepare Linux Virtual Servers for Oracle RAC
3. Prepare Linux Physical Servers for Oracle RAC
4. How To Configure Oracle RAC OCR and Voting Disks
Oracle Software Installation Guide
1. Prepare Linux Environment for GUI Access for Oracle Installation
2. Linux Oracle RAC Installation Guide
3. How to Install Oracle 10gR2 CRS
4. How to Install Oracle 10gR2 ASM
5. How to Install Oracle 10gR2 DB Home
6. How to Install Oracle 10gR4 CRS Patch
7. How to Install Oracle 10gR4 ASM Patch
8. How to Install Oracle 10gR4 DB Home Patch
9. How to Configure Oracle ASM Disks for RAC Virtual Servers
o For Physical see How to Configure ASM Disks for Physical Servers guide.
10. How to Install Oracle 10gR4 ASM Instance
11. How to Install Oracle 10gR4 Database Instance
- Run ./cluvfy stage -pre crsinst -n srv0dbxd11,srv0dbxd12 to verify Cluster is ready.
ASM Installation Order Overview
- Make sure you run /etc/init.d/oracleasm scandisks. (Note if you do not see ASM Disks during install do the following)
- Run crs_stop -all on node 1 to stop CRS.
- Run showcrs to verify everything is offline
- Type reboot to reboot node 1
- Wait until everything is up.
- As Oracle user run, 'while true; do ; showcrs ; sleep 10 ; done
- Wait until everything comes online then continue.
- Run /etc/init.d/oracleasm scandisks again.
- Configure Listener before running dbca
- To configure listener, source +ASM1, enter path /u00/app/oracle/product/10.2.0/ASM/
- srv0dbxd11 | ORA1020 | /export/home/oracle
> . oraenvORACLE_SID = [ORA1020] ? +ASM1ORACLE_HOME = /u00/app/oracle/product/10.2.0/ASM/ - Set TNS Admin
- Use the command (for each node): srvctl setenv nodeapps -n node -T TNS_ADMIN=$ORACLE_HOME/network/admin/
- Run netca and create listeners
- srv0dbxd11 | +ASM1 | /export/home/oracle
> /u00/app/oracle/product/10.2.0/ASM/bin/netca - Select Cluster Configuration then click Next
- Select all nodes then click Next
- Select Listener Configuration then click Next and choose defaults. Exit when completed.
- Run lsnrctl status to verify Listener Parameter file points to /u00/app/oracle/product/10.2.0/ASM/network/admin/listener.ora
- Exit ASM and run showcrs to also verify everything is online. * Should see all 3 listeners online.
How to Install ASM Instance Using DBCA
- Login to node1 via VNC Viewer as Oracle user
- Set oraenv to +ASM1
- srv0dbxd11 | ORA1020 | /export/home/oracle
> . oraenvORACLE_SID = [ORA1020] ? +ASM1 - Run dbca to launch GUI Installer
- srv0dbxd11 | +ASM1 | /export/home/oracle
> /u00/app/oracle/product/10.2.0/ASM/bin/dbca - At the ASM Welcome screen, make sure Oracle Real Application Database radio button is checked, then click Next
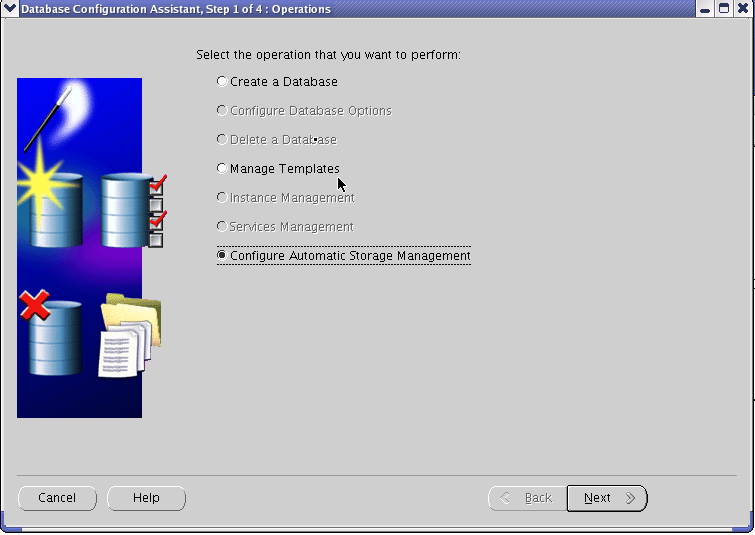
- At the DBCA: Operations screen, select Configure Automatic Storage Management radio button, then click Next.
- At the DBCA: Node Selection screen, select All Nodes then click Next
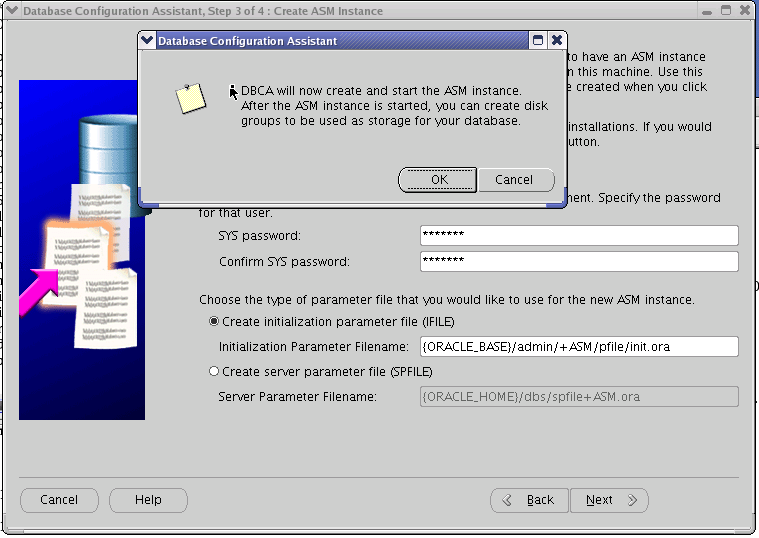
- At the DBCA: Create ASM Instance screen, select Create Initialization Parameter File, then enter SYS Password, then click Next, and at the DBCA screen that says an instance will be created, click OK, to continue.
- This is not an error, The listener process will run from the ASM home. Click Yes to create Listeners.
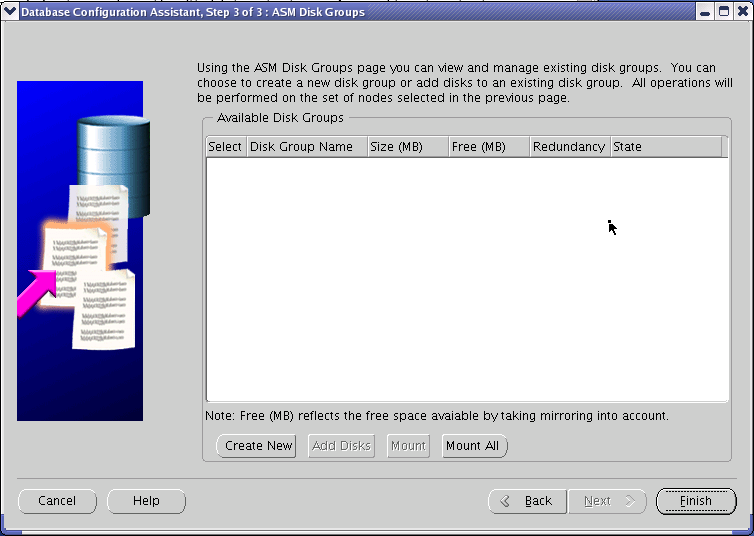
- At the ASM Create Disk Groups screen, click Create New to create ASM Diskgroups for DATA and Backup Disks.
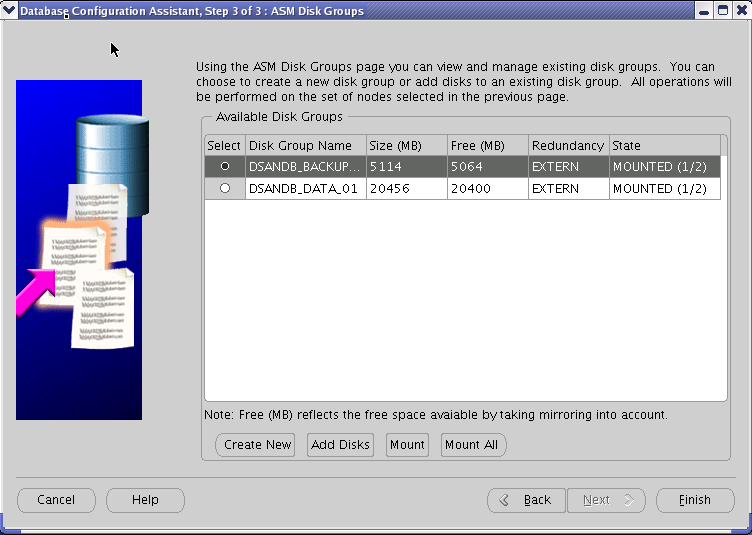
- Create DSAN_DATA_01 first and choose External Redundancy for Mirroring. Use ORCL:X_ASM1 disks for ASM Data Disk Group. Check with Admin for ASM disk layout.


- Create DSAN_BACKUP_01 first and choose External Redundancy for Mirroring. Use /dev/raw/raw10 for ASM Disk Group
- Click Finish to Complete ASM Instance Installation.
- To verifiy ASM Storage Size do the following:
- Login via putty to one of the RAC Nodes
- source +ASM1
- connect via sqlpus
- run select name,total_mb,free_mb from v$asm_diskgroup;
- Return to Linux Oracle RAC Installation Guide or go on to Section 10: How to Install Oracle 10gR4 DB Instance

No comments:
Post a Comment