
This document will explain how to add additional SAN Storage to existing ASM Disk Groups.
Document Creator Modified
Todd Walters 06/19/2009
Requirements
ASM Overview
- Automatic Storage Management (ASM) instance
- Oracle instance that manages the diskgroup metadata
- ASM Disk Groups
- Logical grouping of disks
- Determines file mirroring options
- ASM Disks
- LUNs presented to ASM
- ASM Files
- Files that are stored in ASM
- Best practice is to have disks of same capacity (size, throughput) belonging to the same diskgroup
ASM Production Configuration
- ASM Disks are created on the EMC SAN
- The systems Admin creates the ASM Disks following naming standard, using /etc/init.d/oracleasm
- G_15960070 where:
- G = device letter, /dev/emcpowerg
- 1596 = Last four of Clariion ID
- 0070 = LUN Number
- There are the recommended two Disk Groups created:
- Database Area = PSANDB_DATA_01
- Flash Recovery Area = PSANDB_BACKUP_01
- Normal Redundancy (default)
Sections Overview
- Section 2: View existing ASM Disks
- Section 3: Create Additional Storage/LUN on SAN with Navisphere
- Section 4: Attach New Storage to Oracle RAC Nodes
- Section 5: Present new Storage LUNS to ASM on all Oracle RAC Nodes
Helpful Links
- Oracle ASM Best Practices Guide
Section 1: Update SAN Disk Layout Before Proceeding
- Decide on two disks you will add by reviewing the existing SAN Disk Layout Diagram located in Linux Library >
- Open the existing SAN Disk Layout Diagram and modify to show new storage you will configure.
- Save the file as Visio and as .png file.
- Upload the new updated SAN Disk Layout Diagram visio and png to the Linux Infrastructure Diagrams location.
Section 2: View existing ASM Disks
- View Existing Disk Group
- [root@srv0dbx01 ~]# su - oraclesetting setdirinfo
setting setaliasinfo
srv0dbx01 | ORA1020 | /export/home/oracle
> . oraenv
ORACLE_SID = [ORA1020] ? +ASM1
srv0dbx01 | +ASM1 | /export/home/oracle
> asmcmdASMCMD> lsdg
State Type Rebal Unbal Sector Block AU Total_MB Free_MB Req_mir_free_MB Usable_file_MB Offline_disks Name
MOUNTED EXTERN N N 512 4096 1048576 20479 10664 0 10664 0 PSAN_BACKUP_01/
MOUNTED EXTERN N N 512 4096 1048576 272788 57571 0 57571 0 PSAN_DATA_01/
/Add some process here.
Section 3: Create Additional Storage/LUN on SAN with Navisphere
- Log into Navisphere
- http://192.168.1.160
2. View existing RAID Groups to determine the next available group to use

In this example RAID group 8 would be the next available
3. Right click RAID Groups and select Create RAID Group…
4. Select the appropriate RAID group parameters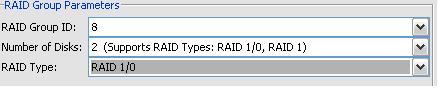
- On Disk Selection select Manual and then press the Select button

- Remove the selected disks and select the next 2 appropriate disks, usually the next disks from Bus 0, Enclosure 1 and Bus 1, Enclosure 0

- Select OK, the click the Apply button
- Click the Yes button to confirm the creation of the new RAID group
- Select the OK button on the success confirmation window
5. Close out of the Create RAID Group window
6. Right click the new RAID group and select Bind LUN…

- Configure Raid Type as RAID 1/0: Mirrored Redundant Individual Access
- Select the raid group you just created for the Raid Group for new LUN: field
Select the correct LUN ID:
- (Our format is 10, 21, 30, 41, 50, 61, 70, 81, 90, 11, 22, 31, 42, 51, see the pattern?)
- Set LUN Size to MAX
- All other settings are default

- Select Apply
- Select Yes to the bind LUN operation window
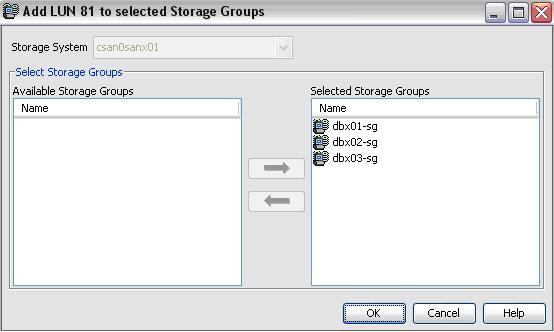
7. Right click your new LUN and select Add to Storage Group…
- Select all 3 storage groups and move them to the right hand column
- These are dbx01-sg, dbx02-sg, dbx03-sg

- Select OK
- Select Yes to the Confirmation window
8. Keep Navisphere open for updating host names later on.
Section 4: Attach New SAN Storage to Oracle RAC Nodes
- Login to Oracle RAC Node 1
- ssh srv0dbx01
- Run PowerPath commands to view current LUNS
- [root@srv0dbx01 ~]# powermt display dev=all | more
- Review existing LUNS and verify new LUN does not show up.
- Change directory to /opt/cci/bin and run lun_scan script.
- [root@srv0dbx01 ~]# cd /opt/cci/bin
- [root@srv0dbx01 bin]# ./lun_scan.sh allScanning lpfc HBA instance with scsi host number : 0
Scanning lpfc HBA instance with scsi host number : 1 - Run PowerPath command to verify new LUN shows up. (Should not see pseudo device at this time)
- [root@srv0dbx01 ~]# powermt display dev=all | more
- Review existing LUNS and verify new LUN is listed.
- Change directory to /etc/init.d and restart PowerPath
- [root@srv0dbx01 ~]# cd /etc/init.d
- [root@srv0dbx01 ~]# ./naviagent stop
- [root@srv0dbx01 ~]# ./PowerPath stop
- [root@srv0dbx01 ~]# ./naviagent start
- [root@srv0dbx01 ~]# ./PowerPath start
- Run PowerPath again to see new PowerPath pseudo device name. (You should see new pseudo device now)
- [root@srv0dbx01 ~]# powermt display dev=all | morePseudo name=emcpowerl
CLARiiON ID=APM00072801596 [dbx01-sg]
Logical device ID=60060160F5701D00187F9D41485CDE11 [LUN 61] - If pseudodevice is not unused or next available device letter, i.e /dev/emcpowerl for example, then use emcpadm to rename pseudodevices. L is assigned to backup on Node 3
- First run emcpadm to find next free pseudo
- [root@srv0dbx01 ~]# emcpadm getfreepseudos
Next free pseudo device name(s) from emcpowera are:
Pseudo Device Name Major# Minor#
emcpowern 120 208 - [root@srv0dbx01 ~]# emcpadm renamepseudo -s emcpowerl -t emcpowerk
- Run PowerPath again to see new PowerPath pseudo device name. (You should see new pseudo device name now)
- [root@srv0dbx01 ~]# powermt display dev=all | morePseudo name=emcpowerkCLARiiON ID=APM00072801596 [dbx01-sg]
Logical device ID=60060160F5701D00187F9D41485CDE11 [LUN 61] - Change directory to /opt/cci/sbin to create inventory of all PowerPath LUNs.
- [root@srv0dbx01 sbin]# ./emcpinvCreated ./emcpinv_srv0dbx01.siteX.com.
- [root@srv0dbx01 sbin]# cat emcpinv_srv0dbx01.siteX.com#######################################################################
# emcpinv
# Timestamp: Fri Jun 19 15:01:47 2009
# Hostname: srv0dbx01.siteX.com
# Pseudo|Logical Dev ID
#######################################################################
emcpowera|60060160F5701D0022F0D4676C74DD11 [LUN 0]
emcpowerb|60060160F5701D0023F0D4676C74DD11 [LUN 1]
emcpowerc|60060160F5701D0024F0D4676C74DD11 [LUN 2]
emcpowerd|60060160F5701D0025F0D4676C74DD11 [LUN 3]
emcpowere|60060160F5701D0026F0D4676C74DD11 [LUN 4]
emcpowerf|60060160F5701D00A89D50024E80DD11 [LUN 30]
emcpowerg|60060160F5701D00DA42E9BC4379DD11 [LUN 10]
emcpowerh|60060160F5701D0052DD912E4479DD11 [LUN 21]
emcpoweri|60060160F5701D009ECAE24C4E80DD11 [LUN 41]
emcpowerj|60060160F5701D00A808FBB64479DD11 [LUN 50]
emcpowerk|60060160F5701D00187F9D41485CDE11 [LUN 61] - Run fdisk to create new partition on pseudo device
- [root@srv0dbx01 bin]# fdisk /dev/emcpowerk
- Choose n > p > 1 > default > default > w
- Run partprobe after exiting fdisk
- Verify the partition was created properly.
- [root@srv0dbx01 bin]# fdisk -l /dev/emcpowerk
Disk /dev/emcpowerk: 21.4 GB, 21474836480 bytes
64 heads, 32 sectors/track, 20480 cylinders
Units = cylinders of 2048 * 512 = 1048576 bytes
Device Boot Start End Blocks Id System
/dev/emcpowerk1 1 20480 20971504 83 Linux - Login to each additional Oracle RAC Nodes and REPEAT Steps 1 through 8.
- Verify that the pseudodevice name and lun are the same on all Nodes. If they are NOT the same, please copy the emcpinv_srv0dbx01.siteX.com to central location then run /opt/cci/sbin/emcpsync on node to sync luns.
Section 5: Present new Storage LUNs to ASM on all Oracle RAC Nodes
- View existing ASM Disks and then scan for new one.
- [root@srv0dbx01 bin]# /etc/init.d/oracleasm listdisks
F_15960030
G_15960010
H_15960021
I_15960041
J_15960050 - [root@srv0dbx01 bin]# /etc/init.d/oracleasm scandisksScanning system for ASM disks: [ OK ]
- Create ASM Disks with oracleasm command, then listdisk to view new ASM Disk.
- [root@srv0dbx01 bin]# /etc/init.d/oracleasm createdisk K_15960061 /dev/emcpowerk1[root@srv0dbx01 bin]# /etc/init.d/oracleasm listdisksF_15960030
G_15960010
H_15960021
I_15960041
J_15960050
K_15960061 - Login to each additional RAC Node and Scan and List ASM Disks to verify.
- [root@srv0smx00 ~]# ssh srv0dbx02
- [root@srv0dbx02 ~]# /etc/init.d/oracleasm scandisks
Scanning system for ASM disks: [ OK ] - Verify new ASM Disk lists:
- [root@srv0dbx02 ~]# /etc/init.d/oracleasm listdisksF_15960030
G_15960010
H_15960021
I_15960041
J_15960050K_15960061 - Repeat Steps 3 and 4 on additional nodes.
- Notify DBA of new ASM Disk and provide new ASM Disk Name. Instruct the DBA to follow How To Create ASM Diskgroup Using SQL Commands document.
Wakkadoo Tech: How To Add Asm Disk To Existing Asm Diskgroups >>>>> Download Now
ReplyDelete>>>>> Download Full
Wakkadoo Tech: How To Add Asm Disk To Existing Asm Diskgroups >>>>> Download LINK
>>>>> Download Now
Wakkadoo Tech: How To Add Asm Disk To Existing Asm Diskgroups >>>>> Download Full
>>>>> Download LINK