- Modify /etc/security/access.conf and add the following line at bottom of file
- - :User1:ALL EXCEPT server1.example.com server1 server2.example.com LOCAL
- Verify these configuration are set in /etc/ssh/sshd_config
- UsePAM yes
- PasswordAuthentication yes
- ChallengeResponseAuthentication no
- Verify or modify /etc/ssh/sshd_config and remove tomcat from DenyUsers if listed
- DenyUsers UserX UserY UserZ
- NOTE: (Only need to modify sshd in pam.d)
- Modify /etc/pam.d/login and add this line before account system-auth line
- account required pam_access.so
- Modify /etc/pam.d/sshd and add this line before “account include password-auth”
- account required pam_access.so
- Restart sshd
- Service sshd restart
- Set temp password for user1
- # passwd user1
- Test login from server1 and server2
- Should be able to login with the password.
- a. [user1@server1 ~]$ ssh user1@server2
- Test login from some other linux box and this should fail.
- [serverX@web]$ ssh user1@server1
- Kernel \\r on an \\m
- user1@server2 password:
- Connection closed by server

Showing posts with label Red Hat. Show all posts
Showing posts with label Red Hat. Show all posts
Tuesday, March 22, 2016
How to Restrict ssh Access
How to Restrict SSH Access for User1

Thursday, July 16, 2015
How to Install Atomic Host on vSphere
RHEL Atomic Host Reference
Register Atomic Host with Subscription Manager
- https://access.redhat.com/articles/rhel-atomic-install-vmware#iso
- https://access.redhat.com/documentation/en-US/Red_Hat_Enterprise_Linux/7/html/Installation_Guide/sect-atomic-virtualization-vmware.html
- right click on Cluster (choose your cluster)
- choose 'Deploy OVF Template'
- On Deploy OVF Template page
- - Local File - location of \*.ova file
- review details > next
- Select Name and Folder - assign name and put in correct Folder
- select Storage > (some datastore) > next
- select network > (some network)
- Add CD and mount the atomic0-cidata.iso that you create and upload to datastore (I had to create this iso, with 2 files, meta-data and user-data.
- We can create additional iso images, because this will use my hostname. AtomicHostX1
- the login is 'cloud-user' password = 'myatomic'
Register Atomic Host with Subscription Manager
- # subscription-manager register --force
- Validate subscription
- -bash-4.2# subscription-manager list
Thursday, March 5, 2015
How to Configure Satellite for IPA Authentication
This page contains links and information about the configuration and How to Configure Satellite for IPA Authentication
Requirements- Admin group to map for Satellite Admins
- Config channel group for other users
How to Configure Satellite
- Install the following packages:
- yum install ipa-client ipa-admintools sssd sssd-dbus mod_auth_kerb mod_authnz_pam mod_lookup_identity mod_intercept_form_submit -y
- Check selinux status (Selinux must be enforcing and can be in permissive mode) by default we turn selinux off. Changing this will require a reboot to relabel all the files with selinux contexts.
- [tuser@client.mydom.com ~]$ getenforceDisabled
- ]$ sestatusSELinux status: disabled
- Since it shows Disabled, we need to change Selinux to Enforcing, then permissive.
- cd /etc/sysconfig and edit selinux file
- change SELINUX=disabled to SELINUX=enforcing
- reboot
- login and change again from enforcing to permissive
- cd /etc/sysconfig and edit selinux file
- change SELINUX=enforcing to SELINUX=permissive
- OR do this
- # setenforce 0[root@client.mydom.com ~]# getenforcePermissive
- Verify it's enabled and in enforcing mode
- [root@Satellite.mydom.com rhn]# getenforcePermissive
- [root@satellite.mydom.com rhn]# sestatusSELinux status: enabledSELinuxfs mount: /selinuxCurrent mode: permissiveMode from config file: permissivePolicy version: 24Policy from config file: targeted
- If you try to run the spacewalk setup ipa command below and selinux is not configured properly you will see this error:
- [root@satellie.mydom.com sysconfig]# spacewalk-setup-ipa-authenticationEnabling authentication against [ipa.mydom.com].Keytab: [/etc/httpd/conf/http.keytab] already exists, will not refetch.Use [klist -kt /etc/httpd/conf/http.keytab] to verify its content.PAM service: File [/etc/pam.d/spacewalk], will not overwrite.Packages: all needed packages are already installed.getsebool: SELinux is disabledMaybe you need to upgrade selinux-policy?
- Once selinux is configured properly we can proceed with IPA Configuration.
- Make sure you have a ticket, run kinit admin
- Now that everything is read, run the following command to configure ipa
- [root@satellite.mydom.com ~]# spacewalk-setup-ipa-authentication
- Enabling authentication against [ipa.mydom.com].Keytab: [/etc/httpd/conf/http.keytab] already exists, will not refetch.Use [klist -kt /etc/httpd/conf/http.keytab] to verify its content.PAM service: File [/etc/pam.d/spacewalk], will not overwrite.Packages: all needed packages are already installed.Turning SELinux boolean [httpd_dbus_sssd] on ...... done.Turning SELinux boolean [allow_httpd_mod_auth_pam] on ...... done.Configuring Apache modules.** /etc/tomcat6/server.xml has been backed up to server.xml-swsave.ipaStopping sssd: [ OK ]Starting sssd: [ OK ]Stopping tomcat6: [ OK ]Starting tomcat6: [ OK ]Stopping httpd: [ OK ]Starting httpd: [ OK ]Waiting for tomcat to be ready ...Authentication against [ipa.mydom.com] sucessfully enabled.As admin, at Admin > Users > External Authentication, selectDefault organization to autopopulate new users into.
- Once IPA Configuration is completed, login to satellite webUI as satadm and configured External Authentication for Admin Group
- The unix/linux group admins will be used to allow team login and permissions to Satellite WebUI
- Go to Admin > Users > External Authentication > Configuration
- Select 'myOrg' for Default Orginization and click Update
- Click on Group Role Mapping tab and then click on + Create External Group
- External Group Name: Enter the external group admins
- Administrative Roles: Select Organization Administrator
- Click Create to save.
- Logout then login with your TID account that is member of admins group. Your login should succeed.
Friday, August 8, 2014
How to Install Red Hat Subscription Manager from ISO
Mount sam iso to server
- # mount -o loop sam.iso /mnt
Install the packages with enhanced reporting
option
- # cd /mnt
- # ./install_packages --enhanced_reporting
Set OpenJDK – Java
- # yum install -y java-1.7.0-openjdk.x86_64
- # alternatives --config java
Run katello-configure
- # katello-configure --deployment=sam --org=Unigroup --user-pass=redhat
Check katello startup
- # chkconfig --list katello
Configure Mongod to start
- # chkconfig –list mongod
- # chckonfig mongod on
- # service mongod start
Start up katello
- # service katello start
Login to SAM URL
- http://localhost/sam
Thursday, June 5, 2014
OpenSSL Heartbleed Again
The OpenSSL published another advisory today for people to update their openssl. Red Hat has also put an Advisory out
- http://www.wired.com/2014/06/heartbleed-redux-another-gaping-wound-in-ssl-uncovered/?mbid=social_fbhttp://www.wired.com/2014/06/heartbleed-redux-another-gaping-wound-in-ssl-uncovered
- https://rhn.redhat.com/errata/RHSA-2014-0627.html
- https://www.redhat.com/archives/enterprise-watch-list/2014-June/msg00009.html
Please update your Red Hat servers.
Quick satellite note, just to sync up your erratta only run the following command:
- # satellite-sync --step=errata
Monday, May 19, 2014
Red Hat Certification Changes
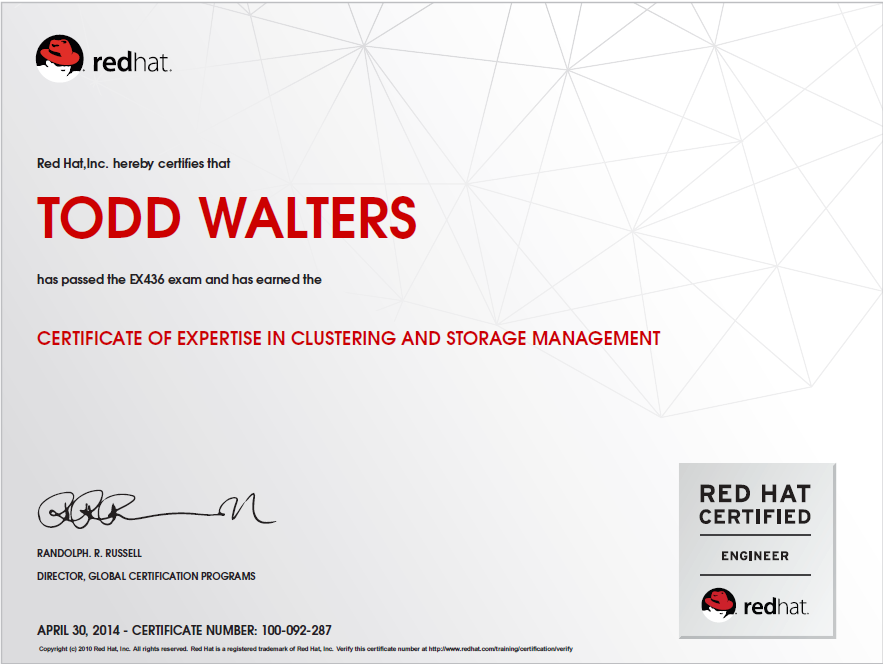
Red Hat announced today that it is making some changes to it's certifications. They will be expanding the number of Red Hat Certificates of Expertise that can be applied to the RHCA. Since I'm on the path to my own RHCA (hope to have it by end of 2014), I'm very interested in these changes. I pretty much have the exam 436 (which I passed last month), the exam 318, and exam 401 scheduled for RHCDS. But now I will have more choices, and so will everyone else, when it comes to RHCA path.
I'm wondering if this will lessen the appeal of RHCA and make it less difficult to acheive?
Read more at this link: http://servicesblog.redhat.com/2014/05/19/red-hat-certification-program-changes
I'm wondering if this will lessen the appeal of RHCA and make it less difficult to acheive?
Read more at this link: http://servicesblog.redhat.com/2014/05/19/red-hat-certification-program-changes
Friday, May 16, 2014
How to Find Age of a Process
If you need to know how old a process is or how long a process has been running you can find it very easily with ps and stat. First find the PID of the process you'd like to know how long it's been running. In this example we will use ntp.
Another way to view time of process
- $ ps -ef |grep ntp
ntp 62446 1 0 2013 ? 00:01:19 ntpd -u ntp:ntp -p /var/run/ntpd.pid -g
Set PID
- # PID=62446
Then just take the PID and run stat on the PID in the /proc directory
- # stat /proc/$PID
- File: `/proc/46448'
- Size: 0 Blocks: 0 IO Block: 1024 directory
- Device: 3h/3d Inode: 48373597 Links: 7
Access: (0555/dr-xr-xr-x) Uid: ( 0/ root) Gid: ( 0/ root)Access: 2014-02-20 15:28:34.229115802 -0600Modify: 2014-02-20 15:28:34.229115802 -0600Change: 2014-02-20 15:28:34.229115802 -0600
- ps -eo pid,etime | grep $PID
Friday, May 2, 2014
HTTP Status Codes
I can't always remember all the HTTP status Codes. I'm creating this blog post just to remember what they are.
1xx: Informational - Request received, continuing process
2xx: Success - The action was successfully received, understood, and accepted
3xx: Redirection - Further action must be taken in order to complete the request
4xx: Client Error - The request contains bad syntax or cannot be fulfilled
5xx: Server Error - The server failed to fulfill an apparently valid request
While many of these are common (404, 200, 403) many are not and hard to remember. This list is modified from the wc3 and the wikipedia.
- Reference from http://en.wikipedia.org/wiki/List_of_HTTP_status_code
1xx: Informational - Request received, continuing process
2xx: Success - The action was successfully received, understood, and accepted
3xx: Redirection - Further action must be taken in order to complete the request
4xx: Client Error - The request contains bad syntax or cannot be fulfilled
5xx: Server Error - The server failed to fulfill an apparently valid request
While many of these are common (404, 200, 403) many are not and hard to remember. This list is modified from the wc3 and the wikipedia.
1xx
informational
100
Client should continue with
request
101
Server is switching protocols
102
Server has received and is
processing the request
103
Resume aborted PUT or POST
requests
122
URI is longer than a maximum
of 2083 characters
2xx success
200
standard response for
successful HTTP requests
201
request has been fulfilled;
new resource created
202
Request accepted, processing
pending
203
Request processed, information
may be from another source
204
Request processed, no content
returned
205
Request processed, no content
returned, reset document view
206
Partial resource return due to
request header
207
XML, can contain multiple
separate responses
208
results previously returned
226
request fulfilled, response is
instance-manipulations
3xx redirection
300
multiple options for the
resource delivered
301
this and all future requests directed to the given URI
302
temporary response to request
found via alternative URI
303
permanent response to request
found via alternative URI
304
resource has not been modified
since last requested
305
content located elsewhere, retrieve from there
306
subsequent requests should use
the specified proxy
307
connect again to different URI
as provided
308
connect again to a different
URI using the same method
4xx client error
400
request cannot be fulfilled due to bad syntax
request cannot be fulfilled due to bad syntax
401
Authentication is possible but has failed
402
Payment required, reserved for
future use
403
Server refuses to respond to
request
404
Requested resource could not
be found
405
Request method not supported
by that resource
406
Content not acceptable
according to the Accept headers
407
client must first authenticate
itself with the proxy
408
server timed out waiting for
the request
409
request could not be processed
because of conflict
410
resource is no longer
available and will not be available again
411
request did not specify the
length of its content
412
server does not meet request
preconditions
413
request is larger than the
server is willing or able to process
414
URI provided was too long for
the server to process
415
server does not support media
type
416
Client has asked for
unprovidable portion of the file
417
Server cannot meet
requirements of Expect request-header field
420
Twitter rate limiting
422
Request unable to be followed
due to semantic errors
423
Resource that is being
accessed is locked
424
Request failed due to failure
of a previous request
426
Client should switch to a
different protocol
428
origin server requires the
request to be conditional
429
user has sent too many
requests in a given amount of time
431
server is unwilling to process
the request
444
server returns no information
and closes the connection
449
request should be retried
after performing action
450
Windows Parental Controls
blocking access to webpage
451
The server cannot reach the
client's mailbox.
499
connection closed by client
while HTTP server is processing
5xx server error
500
generic error message
501
server does not recognise
method or lacks ability to fulfill
502
server received an invalid
response from upstream server
503
server is currently
unavailable
504
gateway did not receive
response from upstream server
505
server does not support the
HTTP protocol version
506
Content negotiation for the
request results in a circular reference
507
Server is unable to store the
representation
508
Server detected an infinite
loop while processing the request
509
Bandwidth limit exceeded
510
Further extensions to the request are required
511
Client needs to authenticate
to gain network access
598
network read timeout behind
the proxy
599
network connect timeout behind
the proxy
Wednesday, April 30, 2014
Monday, February 10, 2014
New Red Hat Overview of RHN Satellite
Red Hat has recently released a new overview of RHN Satellite 5.6. The overview discusses getting started with Red Hat Satellite Server 5.6, new features such as PosgreSQL support, provisioning and auditing improvements and API information. Please read the full article located here https://access.redhat.com/site/articles/708153 (please note a Red Hat login is required.)
Friday, February 7, 2014
RHEL's New and Improved Installation Experience.
Red Hat Enterprise Blog has a new post today about the new and improved installation experience. Please see the post at this page http://rhelblog.redhat.com/2014/02/07/anaconda/
For a RHEL 7 Beta Install Guide see my post here "How to Install Red Hat Enterprise Linux Beta 7"
For a RHEL 7 Beta Install Guide see my post here "How to Install Red Hat Enterprise Linux Beta 7"
Thursday, January 30, 2014
Satellite Post Install Configuration
This document will explain how to activate Satellite and then how to configure the first Channel.
Reference
- Chapter 6 in Red_Hat_Network_Satellite/5.4 Installation Guide
How to Register Satellite & Download & Import Channel Content ISO’s.
- Verify Activation in RHN (optional if using spacewalk)
- Check for spacewalk-backend-tools package
- # rpm –qa | grep backend
- To see list of rhn commands run # rhn-
- To view channels available run
- tmp]# satellite-sync -l | tee channels
- # satellite-sync --list-channels | more
- Run the following to reregister system and entitle/activate Satellite
- [root@satserv rhn]# rhn_register
- [root@satserv rhn]# rhn-satellite-activate --rhn-cert=/root/myco.cert
- Download Satellite Channel Content ISO’s for each channel you will need.
- Red Hat recommends using Channel Content ISO’s locally versus importing directly from RHN website to save time.
- Our example, we only user v6.3 RHEL
- The process to copy Channel Content ISOs is to mount each one, copy its contents to the temporary repository, and then unmount the ISO.
- Mount from your laptop to vmware to satellite server
- [root@satserv mnt]# mkdir /var/satellite/sat-import
- Mount the iso to local in vCenter and then copy from mount point to sat-import
- [root@satserv media]# mount /dev/cdrom /media
- [root@satserv media]# cp -ruv * /mnt /var/satellite/sat-import/
- Repeat these steps for each Channel Content ISO of every channel to be imported.
- The first step in importing channels into the database is listing the channels available for import. This is accomplished with the command:
- satellite-sync --list-channels --mount-point /var/satellite/sat-import
- notes –
- run ‘satellite-sync --list-channels’ option to obtain a list of all channels by label.
- View local channels available
- [root@satserv sat-import]# satellite-sync --list-channels --mount-point /var/satellite/sat-import/
- Start the import of a channel
- [root@satserv sat-import]# satellite-sync -c rhel-x86_64-server-6 --mount-point /var/satellite/sat-import/
- ..output.. 13:20:07 Red Hat Network Satellite - file-system synchronization
13:20:07 mp: /var/satellite/sat-import
13:20:07 db: rhnsat/<password>@rhnsat
13:20:08 Retrieving / parsing additional arches data
13:20:08 additional arches data complete
13:20:08
13:20:08 Retrieving / parsing channel data
13:20:09 p = previously imported/synced channel
13:20:09 . = channel not yet imported/synced
13:20:09 base-channels:
13:20:09 . rhel-x86_64-server-6 8203 full import from Mon Jun 25 12:52:55 2012
13:20:09
13:20:10 Channel data complete
13:20:10
13:20:10 Retrieving / parsing blacklists data
13:20:10 blacklists data complete
13:20:10
13:20:10 Retrieving / parsing product names data
13:20:10
13:20:10 Retrieving short package metadata (used for indexing)
13:20:10 Retrieving / parsing short package metadata: rhel-x86_64-server-6 (8203)
13:20:43 Diffing package metadata (what's missing locally?): rhel-x86_64-server-6
________________________________________
Diffing: ######################################## - complete
13:20:57
13:20:57 Downloading package metadata
13:20:57 Retrieving / parsing *relevant* package metadata: rhel-x86_64-server-6 (8203)
13:20:57 * WARNING: this may be a slow process.
________________________________________
Downloading:################################ ---output truncated--- 8203/8203 Fetch successful: freeradius-2.1.12-3.el6.x86_64.rpm (1458248 bytes)
13:38:36 Processing rpm packages complete
13:38:36
13:38:36 Importing package metadata
13:38:36 Importing *relevant* package metadata: rhel-x86_64-server-6 (8203)
13:38:36 * WARNING: this may be a slow process.
________________________________________
Importing: # ---output truncated---
This conducts the following tasks in this order:
- Populating the tables describing common features for channels ( channel families). This can also be accomplished individually by passing the --step=channel-families option to satellite-sync.
- Creating a particular channel in the database and importing the metadata describing the channel. Individually, use the --step=channels option.
- Moving the RPM packages from the temporary repository into their final location. Individually, use the --step=rpms option.
- Parsing the header metadata for each package in the channel, uploading the package data, and associating it with the channel. Individually, use the --step=packages option.
- Identifying Errata associated with the packages and including them in the repository. Individually, use the --step=errata option.
- See Chapter 7 Troubleshooting for help Download RHN tools (or any channel from –list-channels)
- satellite-sync --channel=rhn-tools-rhel-x86_64-server-6
this process worked and resolved my kickstart profile issue
Set up a cron job in /etc/cron.daily to sync from Red Hat Network
- Create satsync file
- #!/bin/bash if { -e /var/lock/satsync ]; then echo "Satellite sync in progress, exiting" exit 1 fi touch /var/lock/satsync until satellite-sync; do perl -le 'sleep rand 90' done rm -f /var/lock/satsync
- cron.daily]# ll | grep satsync -rwxr-xr-x. 1 root root 209 Aug 15 15:09 satsync
Define your Organization
- Go to Admin > Organization ( or create new organization)
- Fill out appropriate information
- Once created, you need to assign system entitlementsfor:
- Management (Needed to register with Satellite file management, etc.)
- Monitoring (Needed for Monitoring)
- Provisioning (Needed for bare metal installation, config
- Virtualization (Needed for any machine doing virtualization which is not unlimited)
- Virtualization Platform (Needed for any machine with unlimited virtualization)
Configuration File Management
- Go to Configuration > Create New Config Channel
- Fill in Name, Label, & Description, then click create
- Click Add Files
- Click Create File
- Create the file
Create ‘Company default’ Config Channel #This is the Myco Config File # It uses variables and will be customized on # per host basis.
MY_SYSTEMID={|rhn.system.sid|} MY_PROFILE_NAME={|rhn.system.profile_name|} MY_SYSTEM_DESCRIPTION={|rhn.system.description|} MY_HOSTNAME={|rhn.system.hostname|} MY_SYSTEM_IP={|rhn.system.ip_address|} MY_ETH0_IP={|rhn.system.net_interface.ip_address(eth0)|} MY_ETH0_NETMASK={|rhn.system.net_interface.netmask(eth0)|} MY_ETH0_BCAST={|rhn.system.net_interface.broadcast(eth0)|} MY_ETH0_MAC={|rhn.system.net_interface.hardware_address(eth0)|} MY_ETH0_DRIVER={| rhn.system.net_interface.driver_module(eth0)|}
MY_SYSTEMID={|rhn.system.sid|} MY_PROFILE_NAME={|rhn.system.profile_name|} MY_SYSTEM_DESCRIPTION={|rhn.system.description|} MY_HOSTNAME={|rhn.system.hostname|} MY_SYSTEM_IP={|rhn.system.ip_address|} MY_ETH0_IP={|rhn.system.net_interface.ip_address(eth0)|} MY_ETH0_NETMASK={|rhn.system.net_interface.netmask(eth0)|} MY_ETH0_BCAST={|rhn.system.net_interface.broadcast(eth0)|} MY_ETH0_MAC={|rhn.system.net_interface.hardware_address(eth0)|} MY_ETH0_DRIVER={| rhn.system.net_interface.driver_module(eth0)|}
Create System Groups
- We’ll create 3 System Groups based on Environment (Dev, Stg, Prod)
- Create 3 system groups on role (app, db, web)
- note: Determine additional groups as needed
- Go to Systems > System groups > Create New Group
- Enter group name and description
Clone a Channel
- This is good idea for creating dev, stg, prod channels and keeping track of software at each channel.
- Currently only cloned RHEL Server 6 Channel and to Dev-Rhel Server 6
- Fill in Description & maintainer information then Update Channel
- Clone all Child Channels as well
- Repeat for other channels as needed.
Create a Custom Channel (for PostgreSQL )
- Go to Channels > Manage Software Channels > Create New Channel
- Enter the following information
- Basic Channel Details
- Channel Name
- Channel Label
- Select Parent Channel
- Select Parent Channel Arch [x86_64]
- Channel Summary
- Channel Maintainer / Contact
- Maintainer Name
- Maintainer Contact info
- Support Policy (if any)
- Channel Access Control
- Per-User Subs
- Organization Sharing
- Security GPG Key
- If you have GPG enter it here
- Then click Create Channel
- Create Custom Repository (if available, otherwise push packages in via rhnpush)
- Locate the YUM Repo URL
- Click on Manage Repositories > Create New Repository
- Enter the Repo – label and URL and then click Create Repository
- Go to Software Channels > Select your Channel > Repositories
- Select the new Repo then click on Update List > Update Repositories
- There are 3 methods to Sync
- Method 1: Go to Repos > Sync and verify the Repo is there, then click Sync Now
- Method 2 = command line, skip to next step 8
- Method 3 – To only sync select packages to Repo, Skip to Step 10.
- Use spacewalk-repo-sync to sync packages from thirdparty (postgresql ) Repo
- ]# spacewalk-repo-sync --channel postgresql-9.1
- To push single packages Use rhnpush to move to satellite all PostgreSQL server packages.
- tmtw1]# rhnpush postgresql91-9.1.4-3PGDG.rhel6.x86_64.rpm postgresql91-contrib-9.1.4-3PGDG.rhel6.x86_64.rpm postgresql91-libs-9.1.4-3PGDG.rhel6.x86_64.rpm --server=https://satserv.mycoinc.com/APP -u satadm -p satellite -c postgresql-9.1 note: install GPG key [root@satserv /]# rpm -ivh pgdg-redhat91-9.1-5.noarch.rpm Preparing... ########################################### [100%] 1:pgdg-redhat91 ########################################### [100%] [root@satserv /]# cd /etc/pki/rpm-gpg/ [root@satserv rpm-gpg]# ls RPM-GPG-KEY-PGDG-91 RPM-GPG-KEY-redhat-legacy-former RPM-GPG-KEY-redhat-legacy-rhx RPM-GPG-KEY-redhat-beta RPM-GPG-KEY-redhat-legacy-release RPM-GPG-KEY-redhat-release [root@satserv rpm-gpg]# rpm --import RPM-GPG-KEY-PGDG-91 Copy the GPG key into /var/www/html/pub on theSatellite Server so that existing servers can access it using:
- rpm import http://[server]/pub/[key]
How to Create Activation Keys
- Go to Systems > Activation Keys > Create New Key
- Type a description and Key name
- Desc = Master Key
- Key = master-key
- Select Provisioning
- Click ‘Create Activation Key’
- Click on Packages and add these packages to all systems
- # Add ITM Packages
- # Add Packages for MYCO
- # Add Telnet Client
- compat-libstdc++-33-3.2.3-69.el6.x86_64
- glibc.x86_64
- ksh.x86_64
- nfs-utils
- nss-softokn-freebl.x86_64
- python-dmidecode
- python-ethtool
- rhn-check
- rhn-setup
- rhncfg
- rhncfg-actions
- rhncfg-client
- telnet.x86_64
- yum-rhn-plugin
Create MYCO Configuration Channel
- Uploaded the following files into Config Channel
- /path/to/files/file1
- /path/to/files/file2
- Created new Kickstart Post Script with following contents
- # Get MYCO Required Packages and Install set -x SOURCEDIR="/software/MYCO"if [ ! -d $SOURCEDIR ] then mkdir -p $SOURCEDIR fi wget -P /software/MYCO http://myco103/MYCO/gskcrypt64-8.0.14.11.linux.x86_64.rpm wget -P /software http://myco103/MYCO/gskssl64-8.0.14.11.linux.x86_64.rpm wget -P /software http://myco103/MYCO/TIVsm-API64.x86_64.rpm wget -P /software http://myco103/MYCO/TIVsm-BA.x86_64.rpm
- # Yum local install the RPM's yum localinstall /software/MYCO/*.rpm -y
Add NTP to Script 2 (standard Script # Configure NTP echo "server ntp.mycoinc.com >> /etc/ntp.conf ntpdate -u ntp.mycoinc.com chkconfig --levels 2345 ntpd on
Subscribe to:
Posts (Atom)